How To Set Up A Remote IoT Web SSH Server On Windows 10
Setting up a remote IoT web SSH server on Windows 10 has become an increasingly popular solution for users who want to manage IoT devices remotely. Whether you're a tech enthusiast or a professional, knowing how to configure your system to support SSH is essential for seamless device management. In this comprehensive guide, we'll walk you through every step of the process, ensuring you can establish a secure and efficient remote IoT SSH server.
Remote access to IoT devices simplifies troubleshooting, monitoring, and configuration tasks. By setting up an SSH server on Windows 10, you can securely connect to your IoT devices from anywhere in the world. This guide will provide detailed instructions, helpful tips, and best practices to help you achieve this setup with ease.
Throughout the article, we'll cover everything from enabling SSH on Windows 10 to configuring your IoT devices for remote access. We'll also discuss important security considerations and troubleshoot common issues that might arise during the setup process. Let's get started!
Read also:Brenda Richie The Extraordinary Journey Of A Trailblazing Actress
Table of Contents
- Introduction to SSH
- Why Use Remote SSH for IoT?
- Prerequisites for Setting Up a Remote SSH Server
Enabling SSH on Windows 10
Configuring IoT Devices for SSH Access
- Setting Up Port Forwarding
Securing Your SSH Server
- Testing Your Remote IoT SSH Setup
- Troubleshooting Common Issues
- Conclusion and Next Steps
Introduction to SSH
Secure Shell (SSH) is a cryptographic network protocol designed for secure communication over unsecured networks. It allows users to connect to remote servers and devices, enabling them to execute commands, transfer files, and manage configurations securely. SSH uses encryption to protect data in transit, ensuring that sensitive information remains confidential.
For IoT enthusiasts, SSH provides a reliable way to interact with connected devices remotely. By setting up an SSH server on Windows 10, you can manage your IoT devices without being physically present. This setup is particularly useful for monitoring environmental sensors, controlling smart home appliances, or managing industrial automation systems.
SSH is widely adopted due to its robust security features and ease of use. In the following sections, we'll explore why remote SSH is ideal for IoT applications and how to configure it on Windows 10.
Why Use Remote SSH for IoT?
Remote SSH offers several advantages for IoT device management:
- Security: SSH encrypts all communication between your local machine and the IoT device, preventing unauthorized access.
- Convenience: With SSH, you can manage multiple IoT devices from a single location, streamlining your workflow.
- Automation: SSH supports scripting, allowing you to automate repetitive tasks and improve efficiency.
- Flexibility: SSH works across various platforms, making it compatible with most IoT devices and operating systems.
By leveraging SSH for IoT, you can reduce the need for physical interventions, saving time and resources. Additionally, SSH's reliability ensures that your devices remain accessible even in challenging network conditions.
Prerequisites for Setting Up a Remote SSH Server
Before you begin, ensure you have the following:
Read also:Unveiling The Mystery Of Any Stran A Comprehensive Guide
- A Windows 10 computer with administrative privileges.
- An active internet connection with a stable bandwidth.
- An IoT device configured with SSH capabilities.
- A router that supports port forwarding.
- A domain name or dynamic DNS service for easier access.
Having these prerequisites in place will simplify the setup process and ensure a smoother experience. If any of these items are missing, consider acquiring them before proceeding.
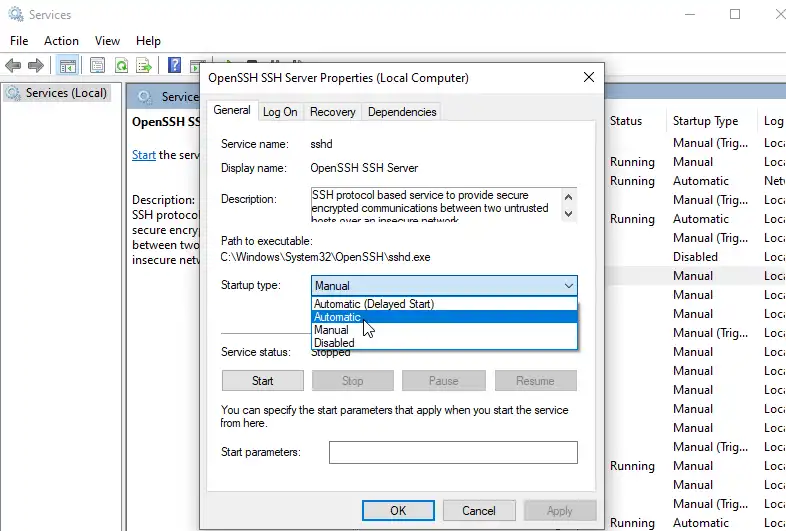
Enabling SSH on Windows 10
Step 1: Install the OpenSSH Server
Windows 10 includes OpenSSH as an optional feature. To enable it:
- Open the Start menu and search for "Turn Windows features on or off."
- In the dialog box, scroll down and check the box next to "OpenSSH Server."
- Click "OK" and restart your computer if prompted.
Step 2: Configure the Firewall
To allow SSH connections, you need to create an inbound rule in the Windows Firewall:
- Go to Control Panel > System and Security > Windows Defender Firewall.
- Select "Advanced settings" from the left-hand menu.
- Click "Inbound Rules" and then "New Rule."
- Choose "Port" as the rule type and specify port 22 (the default SSH port).
- Allow the connection and apply the rule to all network profiles.
With these steps, your Windows 10 machine is now ready to act as an SSH server.
Configuring IoT Devices for SSH Access
Step 1: Enable SSH on Your IoT Device
Most modern IoT devices support SSH out of the box. Check your device's documentation for specific instructions. Typically, you'll need to:
- Log in to the device's web interface or management console.
- Locate the "SSH" or "Remote Access" settings.
- Enable SSH and note the assigned IP address.
Step 2: Test the Connection
Before proceeding further, test the SSH connection between your Windows 10 machine and the IoT device:
- Open the Command Prompt or PowerShell.
- Type the command
ssh username@device_ip, replacing "username" and "device_ip" with your actual credentials. - Enter the password when prompted.
If the connection is successful, you're ready to move on to the next step.
Setting Up Port Forwarding
Port forwarding allows external devices to access your SSH server through your router. To configure port forwarding:
- Log in to your router's admin interface using its IP address (usually 192.168.0.1 or 192.168.1.1).
- Locate the "Port Forwarding" or "Virtual Servers" section.
- Add a new rule, specifying port 22 as the external and internal ports.
- Set the internal IP address to your Windows 10 machine's IP address.
- Save the changes and restart the router if necessary.
Port forwarding is crucial for enabling remote access to your SSH server. Without it, external devices won't be able to connect.
Securing Your SSH Server
Best Practices for SSH Security
While SSH is inherently secure, taking additional precautions can further enhance its protection:
- Change the Default Port: Modify the SSH port from 22 to a non-standard number to deter automated attacks.
- Use Key-Based Authentication: Disable password-based logins and rely on SSH keys for authentication.
- Limit User Access: Restrict SSH access to specific users or IP addresses.
- Enable Two-Factor Authentication: Add an extra layer of security by requiring a second form of verification.
Implementing Key-Based Authentication
Key-based authentication eliminates the need for passwords, reducing the risk of brute-force attacks:
- Generate an SSH key pair using the command
ssh-keygen. - Copy the public key to your IoT device using
ssh-copy-id. - Disable password authentication in the SSH server configuration file.
By following these steps, you can significantly improve the security of your SSH server.
Testing Your Remote IoT SSH Setup
After completing the setup, test your remote IoT SSH server to ensure everything works as expected:
- From another device, attempt to connect to your Windows 10 machine using its public IP address or domain name.
- Verify that you can execute commands and interact with your IoT devices.
- Monitor the server logs for any suspicious activity.
If the test is successful, your remote IoT SSH server is ready for use!
Troubleshooting Common Issues
Here are some common issues you might encounter and their solutions:
- Connection Refused: Ensure the SSH service is running and the firewall allows traffic on port 22.
- Authentication Failed: Double-check your username, password, and SSH key configuration.
- Port Forwarding Not Working: Verify the router settings and confirm the internal IP address is correct.
- Slow Performance: Optimize your network settings and reduce unnecessary background processes.
If these solutions don't resolve your issue, consult the official documentation or seek help from online communities.
Conclusion and Next Steps
In this guide, we've covered how to set up a remote IoT web SSH server on Windows 10, including enabling SSH, configuring IoT devices, setting up port forwarding, and securing your server. By following these steps, you can manage your IoT devices remotely with ease and confidence.
To further enhance your setup, consider exploring advanced features such as SSH tunneling, automated scripts, and monitoring tools. Additionally, stay updated with the latest security practices to protect your devices from emerging threats.
We invite you to share your experience in the comments section below. If you found this article helpful, don't forget to share it with others who might benefit from it. For more informative content, explore our other articles on technology and IoT solutions.


